Friday, May 9, 2014

Pleated crib skirt tutorial

Pin It

*** I originally posted this tutorial in early 2011, I had my son in June 2011 and have really neglected this blog! But I somehow had this tutorial set to "draft" and have no idea how that happened. I hope you enjoy! ***


I finally finished the crib skirt for our little one's room! I looked up a bunch of different tutorials online, and then decided to take lots of pictures and make one myself. The two tutorials I found most helpful were from Hibler House and For such a time as this.

The first thing I did was cut out the muslin for the crib skirt deck. I purchased 1 1/2 yards of unbleached muslin that was 44 inches wide. I then cut it to 27 inches by 52 inches.


Then I serged around each of the edges of the muslin, since I figure I'll probably be washing the crib skirt plenty and didn't want it to fray. {If you don't have a serger, you can use a zig zag stitch or see if your sewing machine came with an overcast foot. Here's a tutorial I found on how you can use an overcast foot.}


Then you'll want to use a little dab of fray check on each of the corners before you trim the excess thread off. Let the fray check dry for at least 10 minutes before you make the cuts!


I decided to do a single box pleat crib skirt with a contrasting solid band of fabric on the bottom edge. Since our crib has 3 different height adjustments, I measured from the lowest one to the ground and it was just about 13 inches. So, I figured even though at the beginning when the mattress is higher off the ground, I'd rather the crib skirt look polished when it's at the lowest setting.

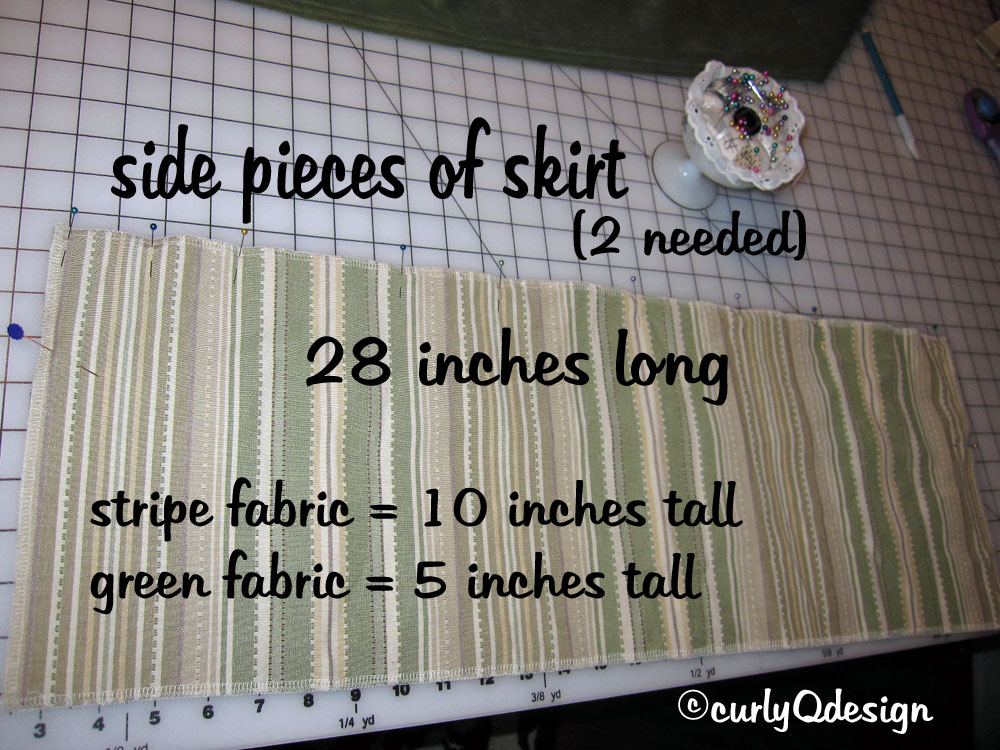
So I cut the following:
1- 56" by 5" green fabric for front of crib skirt (allowing for 4" pleat)
1- 56" by 10" striped fabric for front of crib skirt (allowing for 4" pleat)
2- 28" by 5" green fabric (one for each side of crib skirt)
2- 28" by 10" striped fabric (one for each side of crib skirt)
(I allowed for a 1/2 inch seam allowance for each hem and joining of seams... so the finished crib skirt would be 27" wide by 13" long for the sides, and 51" wide by 13" long for the front)


Then I serged around each of the edges of the striped fabric, because it really wanted to fray!


Again, use a dab of fray check at each corner and allow to dry before cutting thread ends off.


Next, I ironed a 1/2 inch hem for the bottom edge of the crib skirt.


Use a coordinating thread to sew your bottom hem. I sewed the hem at 5/8 of an inch from the edge.

Next, you'll want to pin together your two fabrics, right sides together. If you've serged only one fabric, pin with that fabric on top, so you can be sure to follow just outside of the thread line.


Then, iron open your seam.


If you don't have a walking foot... seriously consider buying one! It's a huge life saver when dealing with slippery (silk, minky) fabrics or with thick cuts of fabric it makes your life MUCH easier.


Again, when sewing two pieces together and only one piece of fabric has been serged, it's a good idea to have that piece on top, to follow along the thread lines of the serger!


I marked the center point of the middle piece of fabric for the skirt, after the 1/2 inch hem at each side the total measurement of the skirt front was 55 inches. So I put a pin at 27 1/2 inches.


And two inches away to the right and left of that center pin, put another pin to mark where you will fold in to make your box pleat.


Then you'll fold over at those points and pin the pleat into place.


Carefully sew over the pleat to secure it in place.


Almost done! Next, connect the front of the crib skirt to the front edge of the crib skirt deck. I put a pin in the center point of the crib skirt deck and matched it up to the center of the box pleat, and started to pin from the middle towards the outside edges. Our crib has pretty big hinges at the corners to lower the mattress as the baby gets bigger, so I left a small gap at each of the corner so the crib skirt would fall correctly.


Then connect each side piece to the crib skirt deck.


Voila! Stand back and enjoy your hard work!!


400 pixels pink sig

Wednesday, December 28, 2011

Half a year!

Here we are, nearly at Michael's seven month birthday, and I've yet to post his six month photos! The saying time flies when you're having fun... very true... especially when I'm also two full months back to "flying" again. I work as a flight attendant, but am VERY lucky that with my seniority (14 1/2 years) I'm able to work two day trips Monday-Tuesday and a one day trip on Fridays... my fabulous in-laws are always on hand when I'm away. Between running my etsy shop, flying, being a wife, and spending as many precious moments with this little guy as possible, I clearly have neglected this blog.

Here are some of the pictures from our monthly photo shoot.


At his six month checkup, he was 20 pounds 10 ounces, and 29 inches! He is already wearing 12 month clothes, and I was sad to learn that a pair of NINE month pjs I purchased last year while pregnant that were for "baby's first christmas" didn't even come close to fitting!!!

As of tonight, December 28th, his top two teeth have cracked through his gums, bringing his tooth count up to FIVE!

He loves to jump when you hold him up in a standing position, but seems to not like his jumparoo as much as he did even a few weeks ago. No real crawling yet, but he is getting up onto all fours and rocking a lot. He also does the backwards scoot pretty well, but gets annoyed that he's going in the wrong direction.

Please slow down little man...

400 pixels pink sig

Monday, November 21, 2011

Five Months and we have

TWO TEETH!

Michael's first tooth popped out on October 22nd. A date I'll always remember, because it's my father's birthday! His second tooth broke through two days later. Poor guy has been trying to maintain his cheerful personality through all of the pain. It breaks my heart.

I continue to make monthly bodysuits to match the saddlecloth colors and numbers of the horses... in case you missed the "why" - check out this post.

Here are the pictures from his FIVE month photo shoot.


Daddy tried to prevent the toppling....


He LOVES being on his tummy!


This picture could either be captioned "Who me?" or... "Could I get a little privacy mom???"


MMUUUWWAHHHHH!


Loving the big wet open mouth kisses we are getting these days. Except when he leaned in to give me a "kiss" on my nose and BIT DOWN.... OUCHIE!!! Not so cute.


We also started "solids" a few weeks ago. So far Michael has had oatmeal, bananas, and sweet potatoes.

Linking up to:
The Girl Creative

400 pixels pink sig

Thursday, October 27, 2011

cutest pumpkin in the patch

Earlier this month we took Michael to the pumpkin patch. After a VERY rainy summer here on Long Island we'd been warned that the pumpkins were pretty moldy and gross this year... but I had high hopes of getting a cute picture of Michael sitting in a field of pumpkins, or maybe holding an itty bitty pumpkin.

Before we headed out, I changed him into an adorable bodysuit that I embroidered for him and this sweet hat that my mom made.


It was a 14 mile drive to the pumpkin patch, and about a 1/2 mile into our drive, this is what our pumpkin looked like!

My sister-in-law gave him that cute bib. It says "My Aunt is HOT and single" and cracks me up!!

Once we got to the pumpkin field, I set about trying to arrange the few least moldy pumpkins into a group to take a picture.

This was the best I could do...


Once we got Michael out of his carseat and next to the pumpkins he was SO not ready to be awake!!!


We headed over to the hayride area and got to take the hayride all by ourselves! It was a Tuesday afternoon and the place was pretty much empty!

I love this picture of Michael holding his Daddy's hand. I often joke that my son reminds me of a labrador puppy, growing into it's paws... his hands and feet seem SO big to me!


After the hayride, we headed back to the pumpkins to try to take a better picture, hoping Michael was a little more awake.

Not so much...


I thought this area looked cute with the little red wagon abandoned in the background. But Michael wasn't sitting up very well on his own.


Here's what happens when you give Daddy the camera and ask him to take a picture of you with the baby sitting on a pumpkin...


There were quite a few animals on the farm, too.


We'll have to make it a tradition to head to this same pumpkin patch each year, and watch our little boy grow.


Linking up to:


Sorry for the overabundance of pictures! It was hard for me to narrow them down.
:)
Happy Fall!

400 pixels pink sig